In the last installment, we looked at some of the functionality provided to all QWidget-descended Qt widgets, and we looked at one specific widget, the QLabel, in more depth. We also worked our way up to an example that illustrated the structure of a simple Python/Qt application. Thus far, however, we're not able to do anything that's very satisfying for our users; our applications can show text to them. You might call them monologue boxes. We need some ways to allow the user to interact with our programs, to turn our monologue into a dialogue. Qt offers a wealth of interactive widgets, and we're going to consider a few of the simpler ones here; we'll use them to explore how to lay out widgets on a form. In the next installment, we're going to learn how to make our application respond to user interaction using slots and signals; this time, we will discuss how to create the widgets and lay them out on a form, including a simple example that uses what we've learned.
Interactive Widgets
Python/Qt makes it easy to allow user interaction; it has a very simple, sensible set of widgets, and they are easy to connect to your application's logic. Let's look at a few.
Buttons
One of the simplest ways to allow users to interact with an application is to let them click a button. Unsurprisingly, Qt has those, called a QPushButton. The QPushButton constructor has three valid signatures:
[python]
QPushButton(parent=None)
QPushButton(text, [parent=None])
QPushButton(icon, text, [parent=None])
[/python]
The parent argument is a QWidget, text is a Python string or unicode, and icon is a QIcon. To create a button owned by some-form with the caption "Go", we would do:
[python]
go_button = QPushButton('Go', some_form)
[/python]
If we want a keyboard shortcut for our button, say Alt-G, we can do that by adding an ampersand before the 'G' in 'Go':
[python]
go_button = QPushButton('&Go', some_form)
[/python]
The 'G' will also be underlined on most platforms.
There are a few other things you can do with buttons. Taking our go_button above, you can make it the form's default button by calling:
[python]
go_button.setDefault(True)
[/python]
You can make it flat:
[python]
go_button.setFlat(True)
[/python]
Passing False to either method has the opposite effect. A button can raise a popup menu when it is clicked; to do this, pass a QMenu object to the button's setMenu method. (We'll investigate menus in a future installment.)
Textboxes
Qt's textbox control is called QLineEdit; it allows the user to enter and/or edit a single line of plain text. It has two constructor signatures:
[python]
QLineEdit(parent=None)
QLineEdit(text, [parent=None])
[/python]
The only difference between the two is that the second sets the text contained in the QLineEdit to text. The QLineEdit object has a great number of methods, but we'll concern ourselves with some of the most basic. You can retrieve its text with the text() method, set it with setText(text), and set the maximum number of characters that can be entered with setMaxLength(chars). It can be made read-only with setReadOnly(True), and placeholder text can be added using (unsurprisingly) setPlaceholderText(text). A QLineEdit has more advanced properties: you can set validators and input masks, handle selections and undo history, and more; we'll get to that later on.
Comboboxes
The QComboBox widget is used to present the user with a number of textual or text/icon choices, of which they must select only one. (For multiple selections, see QListView and QListWidget — we're getting there.) Its constructor receives only a parent:
[python]
QComboBox(parent)
[/python]
It's that simple to construct, but it doesn't have anything in it yet. You can add items in one of several ways. If all your items are textual, you can use addItems(texts), where texts is a list of string items. To add items individually, you can use addItem, which has two valid signatures:
[python]
addItem(icon, text, [userData=None])
addItem(text, [userData=None])
[/python]
where icon is a QIcon, text is a unicode object, and userData is any object. You can insert items using insertItem:
[python]
insertItem(index, icon, text, [userData=None])
insertItem(index, text, [userData=None])
[/python]
or, if all your items are textual, insertItems(texts). The QComboBox is a flexible widget, and much more can be done with it, but this will get you started.
Example Application: Overview
Next, we'll learn how to combine widgets into a form layout — but before we can do that, let's briefly look at this installment's example application.
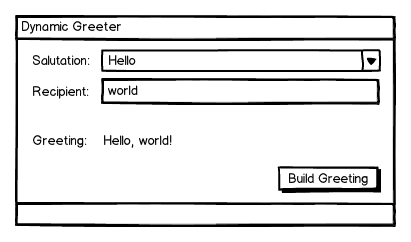
As you can see, it's a very simple application. The user can select a salutation and enter the name of the person (or other entity) they want to greet, and when they click "Build Greeting", the greeting will be shown on a label on the form. It is this form that we'll be laying out in the next section.
Layout Management
PySide and PyQt have two available approaches to layout management: absolute positioning, in which the developer must specify the position and size of each widget, and use of layout containers, which fit widgets into a form in one of many arrangements and handle size and position automatically. We'll construct an interface for the example application described above using both methods.
Absolute Positioning
To set the physical position of a widget in a window, you use the widget's move(x, y) method; x and y are the horizontal and vertical distance, respectively, from the top left corner of the form to the top left corner of the widget. A Here is our form, created using absolute positioning:
[python]
# Every Qt application must have one and only one QApplication object;
# it receives the command line arguments passed to the script, as they
# can be used to customize the application's appearance and behavior
qt_app = QApplication(sys.argv)
class AbsolutePositioningExample(QWidget):
''' An example of PySide absolute positioning; the main window
inherits from QWidget, a convenient widget for an empty window. '''
def __init__(self):
# Initialize the object as a QWidget
QWidget.__init__(self)
# We have to set the size of the main window
# ourselves, since we control the entire layout
self.setMinimumSize(400, 185)
self.setWindowTitle('Dynamic Greeter')
# Create the controls with this object as their parent and set
# their position individually; each row is a label followed by
# another control
# Label for the salutation chooser
self.salutation_lbl = QLabel('Salutation:', self)
self.salutation_lbl.move(5, 5) # offset the first control 5px
# from top and left
self.salutations = ['Ahoy',
'Good day',
'Hello',
'Heyo',
'Hi',
'Salutations',
'Wassup',
'Yo']
# Create and fill the combo box to choose the salutation
self.salutation = QComboBox(self)
self.salutation.addItems(self.salutations)
# Allow 100px for the label and 5px each for borders at the
# far left, between the label and the combobox, and at the far
# right
self.salutation.setMinimumWidth(285)
# Place it five pixels to the right of the end of the label
self.salutation.move(110, 5)
# The label for the recipient control
self.recipient_lbl = QLabel('Recipient:', self)
# 5 pixel indent, 25 pixels lower than last pair of widgets
self.recipient_lbl.move(5, 30)
# The recipient control is an entry textbox
self.recipient = QLineEdit(self)
# Add some ghost text to indicate what sort of thing to enter
self.recipient.setPlaceholderText("e.g. 'world' or 'Matey'")
# Same width as the salutation
self.recipient.setMinimumWidth(285)
# Same indent as salutation but 25 pixels lower
self.recipient.move(110, 30)
# The label for the greeting widget
self.greeting_lbl = QLabel('Greeting:', self)
# Same indent as the others, but 45 pixels lower so it has
# physical separation, indicating difference of function
self.greeting_lbl.move(5, 75)
# The greeting widget is also a label
self.greeting = QLabel('', self)
# Same indent as the other controls
self.greeting.move(110, 75)
# The build button is a push button
self.build_button = QPushButton('&Build Greeting', self)
# Place it at the bottom right, narrower than
# the other interactive widgets
self.build_button.setMinimumWidth(145)
self.build_button.move(250, 150)
def run(self):
# Show the form
self.show()
# Run the Qt application
qt_app.exec_()
# Create an instance of the application window and run it
app = AbsolutePositioningExample()
app.run()
[/python]
Needless to say, that could get cumbersome in a serious application. It also fails to respond well to resizing; the labels just sit there in their assigned locations. Not only that, but imagine if a user with visual impairment has their fonts set extra-large; the fixed positions you set for the controls will no longer be appropriate.
Layout Containers
For all those reasons, layout containers are much more frequently used than absolute positioning; they are more flexible, they take the load of calculating exact positions off the programmer, and they can adjust layout to fit GUI guidelines of different platforms, such as Windows, GTK+, KDE, and Mac OS X, as well as different users' preferences. There are five main layout containers, each of which descends from QLayout:
- QHBoxLayout
- QVBoxLayout
- QGridLayout
- QStackedLayout
- QFormLayout
Each has a different purpose. In a nutshell, the QHBoxLayout and QVBoxLayout arrange widgets one after another horizontally and vertically, respectively; the QGridLayout arranges them in a tabular layout of any size; the QStackedLayout arranges them one on top of each other, allowing them to come to the fore as needed; and the QFormLayout is a specialized grid arrangement with two columns that provides special methods for arranging common forms with labels in the first column and associated controls in the second. These layouts are useful enough on their own, but your layout options are not so limited as that: you can also nest layouts within other layouts to create more complex and flexible patterns for your user interface. For right now, we'll consider the vertical and horizontal box layouts and the QFormLayout.
QVBoxLayout and QHBoxLayout
The box layouts are fairly straightforward. To use one as a top-level layout, you simply create the layout — its constructor requires no arguments — and add widgets to it using the aptly-named addWidget method. Then, you set it as the layout for the window it belongs to. For example:
[python]
T the window
win = QWidget()
# The three labels
lbl_1 = QLabel("We're")
lbl_2 = QLabel('stacked')
lbl_3 = QLabel('up.')
# A vertical box layout
layout = QVBoxLayout()
# Add the widgets to the layout
layout.addWidget(lbl_1)
layout.addWidget(lbl_2)
layout.addWidget(lbl_3)
# Set layout as the layout for the window
win.setLayout(layout)
[/python]
A QHBoxLayout can be used identically, though it is much less common as a top-level layout. It is most common as a sub-layout. To add a sub-layout to another layout, use the layout's addLayout method, e.g.:
[python]
layout = QVBoxLayout()
sub_layout = QHBoxLayout()
# ... Fill the layouts with widgets ...
layout.addLayout(sub_layout)
[/python]
Box layouts have another valuable and frequently-used method: addStretch. A common layout has a number of controls located statically at one end of a box layout, and some at the other end, with flexible empty space in between. To do this, add the widgets at the beginning of the box, add a stretch with a stretch factor greater than zero, i.e. layout.addStretch(1); then add the rest of the widgets.
QFormLayout
The QFormLayout is much like a QVBoxLayout, except that each row can easily be divided into two columns without creating nested layouts. This is done using the form layout's addRow method, which is copiously overloaded. The single-argument versions:
[python]
addRow(QWidget)
addRow(QLayout)
[/python]
Add the widget or layout across the end of the entire QFormLayout. The double-argument versions:
[python]
unicode, QLayout
unicode, QWidget
QWidget, QWidget
QWidget, QLayout
[/python]
Add the initial element in the first column as a "label", for the second, in the second column. The unicode arguments are used as the text of a QLabel; the QWidget can be any widget.
Box Layout Example
Now that we have a basic idea how to create interactive widgets and arrange them in more flexible layouts, let's recreate our interface in a simpler, more flexible way. Our window's main layout will be a QVBoxLayout, with two sub-layouts, a QFormLayout that contains all the labeled controls, and a QHBoxLayout that manages the position of the button at the bottom right. We'll use addStretch to separate the QFormLayout from the QHBoxLayout, and to push the button to the far right of the QHBoxLayout. You may notice that much of the code below is unchanged from the absolute-positioning example; there is no difference, for example, in how the individual controls are created.
[python]
qt_app = QApplication(sys.argv)
class LayoutExample(QWidget):
''' An example of PySide/PyQt absolute positioning; the main window
inherits from QWidget, a convenient widget for an empty window. '''
def __init__(self):
# Initialize the object as a QWidget and
# set its title and minimum width
QWidget.__init__(self)
self.setWindowTitle('Dynamic Greeter')
self.setMinimumWidth(400)
# Create the QVBoxLayout that lays out the whole form
self.layout = QVBoxLayout()
# Create the form layout that manages the labeled controls
self.form_layout = QFormLayout()
# The salutations that we want to make available
self.salutations = ['Ahoy',
'Good day',
'Hello',
'Heyo',
'Hi',
'Salutations',
'Wassup',
'Yo']
# Create and fill the combo box to choose the salutation
self.salutation = QComboBox(self)
self.salutation.addItems(self.salutations)
# Add it to the form layout with a label
self.form_layout.addRow('&Salutation:', self.salutation)
# Create the entry control to specify a recipient
# and set its placeholder text
self.recipient = QLineEdit(self)
self.recipient.setPlaceholderText("e.g. 'world' or 'Matey'")
# Add it to the form layout with a label
self.form_layout.addRow('&Recipient:', self.recipient)
# Create and add the label to show the greeting text
self.greeting = QLabel('', self)
self.form_layout.addRow('Greeting:', self.greeting)
# Add the form layout to the main VBox layout
self.layout.addLayout(self.form_layout)
# Add stretch to separate the form layout from the button
self.layout.addStretch(1)
# Create a horizontal box layout to hold the button
self.button_box = QHBoxLayout()
# Add stretch to push the button to the far right
self.button_box.addStretch(1)
# Create the build button with its caption
self.build_button = QPushButton('&Build Greeting', self)
# Add it to the button box
self.button_box.addWidget(self.build_button)
# Add the button box to the bottom of the main VBox layout
self.layout.addLayout(self.button_box)
# Set the VBox layout as the window's main layout
self.setLayout(self.layout)
def run(self):
# Show the form
self.show()
# Run the qt application
qt_app.exec_()
# Create an instance of the application window and run it
app = LayoutExample()
app.run()
[/python]
Note especially how much easier this is on the programmer. While the code is no shorter — not every convenience leads to less typing, and creating and nesting the layouts has some code overhead — the mental effort is much less. The developer simply needs to arrive at a combination of layouts that produces the desired effect, and create them; the controls can be created and modified in isolation, with little consideration of their effect on the layout of other controls. Next installment, we'll take the interface we created in this example and make it actually do something.