Webviews make it easy to use web technologies to build graphical user interfaces for native applications. Many people already know some webcraft, and it's easy to pick up and well worth knowing, so there's a broad appeal in being able to use these technologies for native apps. This also allows developers to tap into the vast and thriving ecosystem of JavaScript libraries that have gone supernova since HTML5 started rolling out.
To use webviews, you'll obviously need to know some HTML, CSS and JavaScript, so basic familiarity with these languages is assumed in this article.
Webviews with SL4A: A Call and Two Hooks
When you first use webviews, you'll find things work a bit differently than you'd expect coming from programming native graphical interfaces or programming web applications. Thankfully, things are much easier all round. For example, you don't have to manage frame rates or buffers in your event loop as webviews are rendered by an engine, in SL4A's case, WebKit, so the Python code doesn't need to handle any of that. At the same time, you don't have things like AJAX and websockets to manage; you just post simple events to and from the user interface. In many ways, you have the best of both worlds with webviews.
This is one of those things that's easier to explain with some code, so we'll just start with a hello-world and keep incrementing.
To build a webview based app, you need at least one HTML file and one Python script, which implement the view and an app to use it. For simplicity, we'll call them index.html and main.py.
The Webview Call
Below is the content of index.html. The meta tag in the head is just there to tell the device not to try and rescale anything.
[html]
<!DOCTYPE HTML>
<html>
<head>
<meta name="viewport" id="viewport"
content="width=device-width, target-densitydpi=device-dpi,
initial-scale=1.0, maximum-scale=1.0, minimum-scale=1.0"
/>
</head>
<body>
Hello World<be>
with SL4a Webviews
</body>
</html>
[/html]
This is the content of main.py:
[python]
from android import Android
import time
droid = Android()
droid.webViewShow('file:///sdcard/sl4a/scripts/example/index.html')
time.sleep(4)
[/python]
This script creates an Android object, called droid, which is standard procedure for SL4A apps ~ droid exposes the Scripting Layer API. The script then launches the webview using the droid's webViewShow method, passing a local file URL as the only argument. Obviously, you need to edit that URL to point to your HTML file. The script then sleeps for 4 seconds, just so you have time to see the webview on your device before the Python script exits and kills it.
As you can see, launching a webview just takes a single call. To keep the program running indefinitely, and to manage communication between the Python script and the webview, the script will need an event loop, but there's a couple of hooks you need to know about first.
The First Hook
Once you have your webview running, you need to pass messages to it and handle messages from it. Everything boils down to events.
Apart from the Android stuff, the following version of index.html is pretty basic. There's an explanation of how it all works below.
[html]
<!DOCTYPE HTML>
<html>
<head>
<meta name="viewport" id="viewport"
content="width=device-width, target-densitydpi=device-dpi,
initial-scale=1.0, maximum-scale=1.0, minimum-scale=1.0"
/>
<style>
body { background-color: #EEE }
#banner { text-align: center }
#userin {
font-size: 64px;
position: absolute;
left: 10px;
right: 10px;
}
</style>
<script>
var droid = new Android();
function postInput(input) {
// Post the content of the text field to the python side if
// the user has pressed enter (or soft keyboard equivalent)
if (event.keyCode == 13)
droid.eventPost('line', input);
}
</script>
</head>
<body>
<div id="banner">
<h1>SL4A</h1>
<h2>Text to Speech Machine</h2>
</div>
<input id="userin" type="text" spellcheck="false"
autofocus="autofocus" onkeyup="postInput(this.value)"
/>
</body>
</html>
[/html]
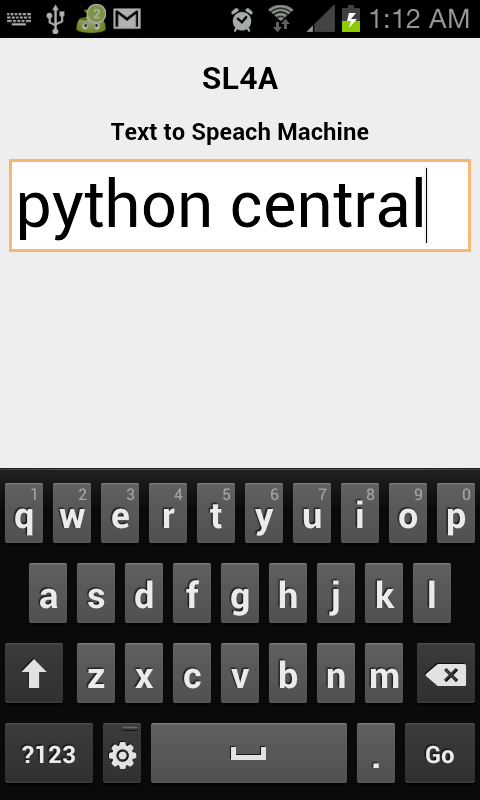
Now, index.html has a textual banner at the top of the page, with a text field underneath that the user can type into. When the user enters some text, the string in the text field is passed to a function, postInput, which posts the string to the Python script as an event, using the Droid's eventPost method. The first argument to eventPost, 'line', is currently irrelevant and could've been anything.
This was a good point to chuck in some simple CSS too, else the text field would have been really small and ugly.
Below is a new version of main.py. This version will launch the webview, then block and wait for an event. When it gets the event, it grabs the data, the string the user entered in the text field, and uses the Android Text to Speech Facade to read out the user input. It exits immediately afterwards, so it will only handle one event.
[python]
from android import Android
droid = Android()
droid.webViewShow('file:///sdcard/sl4a/scripts/example/index.html')
# Wait for an event from webview
event = droid.eventWait().result
# Get the data, the user's input
data = event['data']
# Do text to speech on the input
droid.ttsSpeak(data)
[/python]
It's easy to put the last three lines in a loop to handle multiple events, but it's worth looking at the code a bit more first.
Line 6 assigns droid.eventWait().result to a variable, event. The eventWait method is blocking, it just waits for any event to be posted, then returns a dict that contains information about the event.
Note that all calls to the the Scripting Layer are RPC calls and communication is in JSON. It's the incoming JSON that's always returned, as a dict, by any call to the SL4A API. This is covered in detail elsewhere, but, in short, it's the result that's often all you care about, hence it's commonplace to see API calls written like the one on Line 6.
Anyway, droid.eventWait().result, and therefore event in the script above, is a dict containing information about the event.
If the last three lines of main.py were inside a loop, it could handle multiple events, but then there'd be no way for the user to exit the app cleanly.
The following version of main.py can handle two types of event, line and kill events. The line events will be handled as before; the script just reads a line of user input out loud, but this time, this will happen inside a loop, iterating until a kill event occurs. A kill event will cause the script to exit, taking the webview with it.
The webview itself doesn't currently have any way to post kill events, but that's easily resolved later.
[python]
import sys
from android import Android
droid = Android()
droid.webViewShow('file:///sdcard/sl4a/scripts/example/index.html')
# Complete one iteration for each event
while True:
event = droid.eventWait().result
if event['name'] == 'kill':
sys.exit()
elif event['name'] == 'line':
droid.ttsSpeak(event['data'])
[/python]
Note that the script references event['name'] and event['data']. The following JavaScript snippet just illustrates how events are posted from the front end. The call takes two arguments, both strings. The first is an event name, the second is some event data.
[python]
var droid = new Android();
droid.eventPost('name', 'data');
[/python]
The arguments are passed into main.py as a dict, which it assigns to event. The first argument is available as event['name'], the second as event['data'].
The following version of index.html includes a little more HTML and CSS, adding a button that will post a kill event when it is pressed.
[html]
<!DOCTYPE HTML>
<html>
<head>
<meta name="viewport" id="viewport"
content="width=device-width, target-densitydpi=device-dpi,
initial-scale=1.0, maximum-scale=1.0, minimum-scale=1.0"
/>
<style>
body { background-color: #EEE }
#banner { text-align: center }
#userin {
font-size: 64px;
position: absolute; right:10px; left:10px;
}
#killer {
font-size: 32px; padding: 16px;
position: absolute; bottom:10px; right:10px; left:10px;
}
</style>
<script>
var droid = new Android();
function postInput(input) {
if (event.keyCode == 13)
droid.eventPost('line', input)
}
</script>
</head>
<body>
<div id="banner">
<h1>SL4A</h1>
<h2>Text to Speech Machine 2</h2>
</div>
<input id="userin" type="text" spellcheck="false"
autofocus="autofocus" onkeyup="postInput(this.value)"
/>
<button id="killer" type="button"
onclick="droid.eventPost('kill', '')"
>KILL BUTTON</button>
</body>
</html>
[/html]
The app now has a webview that can post multiple types of event, distinguished by name, that carry data about the event to handler code in the Python event loop. Now that you understand how to post events 'inward', from JavaScript to Python, you just need to know how to post events 'outward', from Python to JavaScript. Then you have all the bits you need to do graphical user interfaces with webviews in SL4A.
The Second Hook
Posting an event from Python is really easy, especially if you know how it's done in JavaScript. Basically, you just use the same API in the same way, with droid.eventPost('name', 'data'). Handling events in JavaScript is a little different though. JavaScript is event oriented, so the event loop is implicit. To handle events in JavaScript, you need to register callbacks. In this case, you register functions to handle events by name, using droid.registerCallback('name' some_function).
The following JavaScript snippet registers a simple callback, using a lambda, for handling spam events.
[javascript]
droid.registerCallback('spam', function(e) {
alert(e.data)
});
[/javascript]
Note that the function receives one argument, e, which is the event. It has all the properties you should now expect from an event object.
SL4A Webview: Complete Example
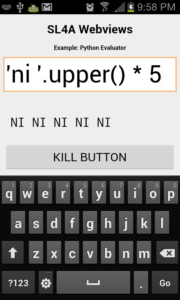
This final version of the example code implements a crude Python evaluator. It simply evaluates any Python expression the user enters and prints the result in the webview.
Doing this only requires a few small changes to index.html: In the body, there's an empty div with an id named output, which is where the output of the evaluation will appear, and, in the style sheet, there's a few simple tweaks for this output div. The only other change is to the JavaScript, where a callback is registered that will handle stdout events. The function just prints the event data to the output div, overwriting whatever might have been there before.
[html]
<!DOCTYPE HTML>
<html>
<head>
<meta name="viewport" id="viewport"
content="width=device-width, target-densitydpi=device-dpi,
initial-scale=1.0, maximum-scale=1.0, minimum-scale=1.0"
/>
<style>
body { background-color: #EEE }
#banner { text-align: center }
#userin {
font-size: 64px;
position: absolute;
right: 10px;
left: 10px;
}
#output {
font-size: 32px;
font-family: monospace;
padding: 20px;
position: absolute;
top: 250px;
}
#killer {
font-size: 32px;
padding: 16px;
position: absolute; bottom: 10px;
right: 10px;
left: 10px;
}
</style>
<script>
var droid = new Android();
function postInput(input) {
if (event.keyCode == 13)
droid.eventPost('line', input)
droid.registerCallback('stdout', function(e) {
document.getElementById('output').innerHTML = e.data;
});
}
</script>
</head>
<body>
<div id="banner">
<h1>SL4A Webviews</h1>
<h2>Example: Python Evaluator</h2>
</div>
<input id="userin" type="text" spellcheck="false"
autofocus="autofocus" onkeyup="postInput(this.value)"
/>
<div id="output"></div>
<button id="killer" type="button"
onclick="droid.eventPost('kill', '')"
>KILL BUTTON</button>
</body>
</html>
[/html]
On the Python side, the only change is in how line events are handled. Now, a function called line_handler takes the line, evaluates it, converts the result to a string and then passes the string to the webview as the data for a sdtout event.
[python]
import sys
from android import Android
droid = Android()
def line_handler(line):
''' Evaluate user input and print the result into a webview.
This function takes a line of user input and calls eval on
it, posting the result to the webview as a stdout event.
'''
output = str(eval(line))
droid.eventPost('stdout', output)
droid.webViewShow('file:///sdcard/sl4a/scripts/example/index.html')
while True:
event = droid.eventWait().result
if event['name'] == 'kill':
sys.exit()
elif event['name'] == 'line':
line_handler(event['data'])
[/python]
Admittedly, this isn't the most exciting or polished app in the world, but it does illustrate how the Events API can be used with webviews to create graphical user interfaces. You could use the code module to turn this example app into a Python interactive interpreter without too much work, or use ACE to build a code editor that's better than the crappy SL4A built in one, or just replace the SL4A interface entirely.
There's a ton of good JavaScript libraries available now days for building front-ends. With Python on Android underneath, you can get really creative.
Obviously, it's all a bit of a hack, but it's a nice one. For a dev who just needs to modify some phones, or a hobbyist wanting to put out a tablet RPG, really for anyone who just wants an nice easy way to do a graphical app on an Android device, webviews are ideal.
Note: The Events API is a little richer and a lot more powerful than this example demonstrates, but the call to webViewShow and the two hooks, posting events from JavaScript to the Python event loop and from Python to JavaScript callbacks, are all you need to build a webview based user interface.
Note: Remember, you're still building a regular SL4A application, so you can use all the native Android UI components, like dialogues, toasts, notifications and so on, alongside webviews, giving you a nice and simple tool set for building rich Android applications with Python and HTML5.