In the previous article Activate Admin Application for Your Python Django Website, we learned how to activate the built-in Admin Application from Django in your website. In this article, we are going to write simple views for your website.
What is a view?
In Django, a view is an endpoint that can be accessed by any client to retrieve data over the wire. For example, some views serve data rendered with a template to a web server that in turn serves the HTML page to a client. While other views serve JSON data to a web server and these views become part of a RESTful API.
In Django, views are simple Python functions or methods which return data to a front-end web server. When a request comes in, Django chooses a view by examining the request's URL after the domain name. In order to call the correct view when a request is made, you need to insert a list of URL patterns into myblog/urls.py. A URL pattern is a regular expression based string which specifies the generic form of a view's URL. For example, r'^posts/(?P\d{4})/$' matches all URLs whose parts after the domain name follow the pattern of a string 'posts' followed by a four-digits number.
Views for Our Django Website
In our blog website, we will write the following views:
Post"index" view that displays a list of most recent posts or popular posts in the blog, just like the home page of Python CentralPost"detail" view that displays the details of aPost, which is similar to each individual article page on Python Central
In the "index" view, a user should be able to see a list of latest Posts made by others. In the "detail" view, a user should be able to see the content of a Post as well as a list of Comments made by others.
Index View
Let's write your first view "index" that shows a list of most recent Posts. Create a file myblog/views.py with the following content:
[python]
from django.http import HttpResponse
def index(request):
return HttpResponse('This page shows a list of most recent posts.')
[/python]
And modify the file myblog/urls.py:
[python]
from django.conf.urls import patterns, include, url
# Uncomment the next two lines to enable the admin:
from django.contrib import admin
admin.autodiscover()
urlpatterns = patterns('',
# Add the following line to link the root URL to the function myblog.views.index()
url(r'^$', 'myblog.views.index', name='index'),
# url(r'^myblog/', include('myblog.foo.urls')),
# Uncomment the admin/doc line below to enable admin documentation:
url(r'^admin/doc/', include('django.contrib.admindocs.urls')),
# Uncomment the next line to enable the admin:
url(r'^admin/', include(admin.site.urls)),
)
[/python]
Now you can access 127.0.0.1:8000 in your browser to view the content returned by myblog.views.index():

Since the return value of myblog.views.index is a string "This page shows a list of most recent posts.", it shows up on this page. Next, we are going to modify the function myblog.views.index to return a list of Posts that are posted no earlier than two days ago:
[python]
from datetime import datetime, timedelta
from django.http import HttpResponse
from myblog import models as m
def index(request):
two_days_ago = datetime.utcnow() - timedelta(days=2)
recent_posts = m.Post.objects.filter(created_at__gt=two_days_ago).all()
return HttpResponse(recent_posts)
[/python]
Now you can refresh 127.0.0.1:8000 to see that no post is made less than two days ago:

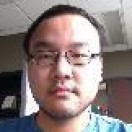
Let's go ahead and add a Post using the Admin interface at the Admin Site:
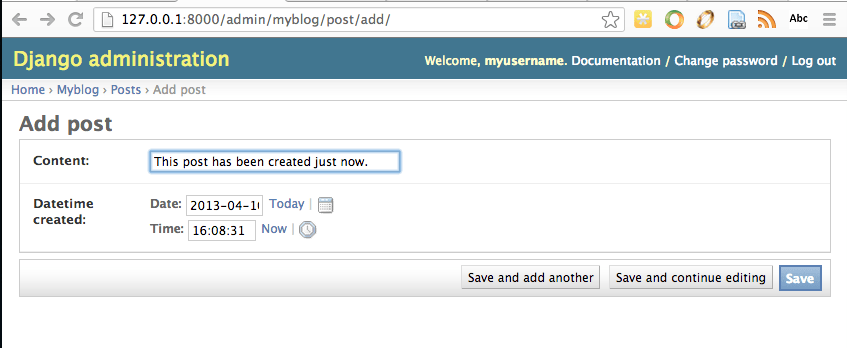
Click "Save" and the post admin page should show that a new post is added and there're three posts total in the database now:
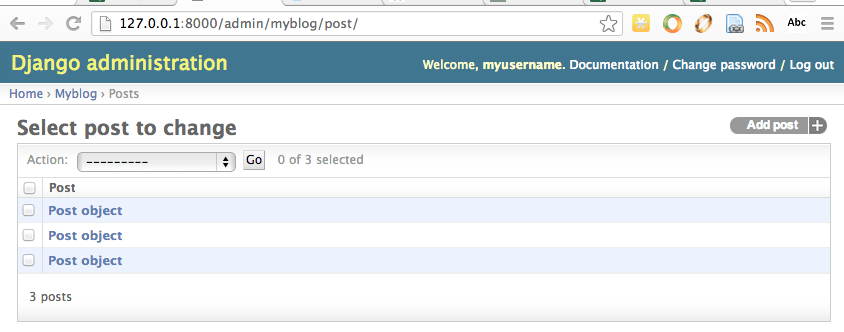
Now you can refresh the Home Page to see that one Post is returned:
Django Views Templates
Obviously, only displaying "Post object" is not very helpful to the users and we need a more informative page to show a list of Posts. This is when a template would be helpful to turn an useless page like the current one into a presentable one.
Create a new file myblog/templates/index.html with the following content:
[python]
{% if post_list %}
<ul>
{% for post in post_list %}
<li>
<a href="/post/{{ post.id }}/">{{ post.content }}</a>
<span>{{ post.created_at }}</span>
</li>
{% endfor %}
</ul>
{% else %}
<p>No post is made during the past two days.</p>
{% endif %}
[/python]
And modify the file myblog/views.py to use the Django template system to render the response of 127.0.0.1:8000:
[python]
from datetime import datetime, timedelta
from django.http import HttpResponse
from django.template import Context, loader
from myblog import models as m
def index(request):
two_days_ago = datetime.utcnow() - timedelta(days=2)
# Retrieve a list of posts that are created less than two days ago
recent_posts = m.Post.objects.filter(created_at__gt=two_days_ago).all()
# Load the template myblog/templates/index.html
template = loader.get_template('index.html')
# Context is a normal Python dictionary whose keys can be accessed in the template index.html
context = Context({
'post_list': recent_posts
})
return HttpResponse(template.render(context))
[/python]
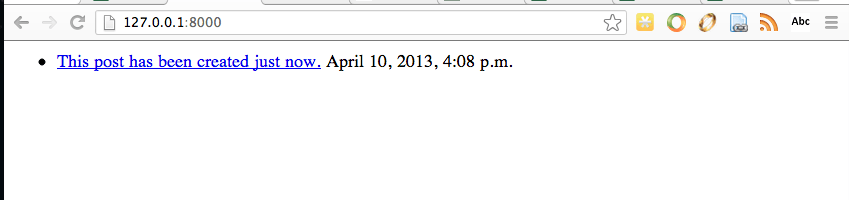
Now you can refresh the Home Page again to see that one Post is rendered using the template in myblog/templates/index.html:
Although the current code of the view index() works, it's a bit longer than necessary. You can shorten the code using a Django shortcut render:
[python]
from datetime import datetime, timedelta
from django.http import HttpResponse
from django.shortcuts import render
from django.template import Context
from myblog import models as m
def index(request):
two_days_ago = datetime.utcnow() - timedelta(days=2)
recent_posts = m.Post.objects.filter(created_at__gt=two_days_ago).all()
context = Context({
'post_list': recent_posts
})
# Render accepts three arguments: the request object, the
# path of the template file and the context
return render(request, 'index.html', context)
[/python]
Django's Detail View
Similar to the index view, the detail view shows a page that presents detailed information about a Post at URLs like /post/1/detail.html, where 1 is the id of a Post.
Similar to the index view, you need to write the URL pattern before writing the detail view. Modify the file myblog/urls.py in the following way:
[python]
from django.conf.urls import patterns, include, url
# Uncomment the next two lines to enable the admin:
from django.contrib import admin
admin.autodiscover()
urlpatterns = patterns('',
url(r'^$', 'myblog.views.index', name='index'),
# Map the view function myblog.views.post_detail() to an URL pattern
url(r'^post/(?P<post_id>\d+)/detail.html$',
'myblog.views.post_detail', name='post_detail'),
# url(r'^myblog/', include('myblog.foo.urls')),
# Uncomment the admin/doc line below to enable admin documentation:
url(r'^admin/doc/', include('django.contrib.admindocs.urls')),
# Uncomment the next line to enable the admin:
url(r'^admin/', include(admin.site.urls)),
)
[/python]
Then you can implement the view function in myblog/views.py:
[python]
from datetime import datetime, timedelta
from django.http import Http404, HttpResponse
from django.shortcuts import render
from django.template import Context
from myblog import models as m
def index(request):
two_days_ago = datetime.utcnow() - timedelta(days=2)
recent_posts = m.Post.objects.filter(created_at__gt=two_days_ago).all()
context = Context({
'post_list': recent_posts
})
return render(request, 'index.html', context)
# post_detail accepts two arguments: the normal request object and an integer
# whose value is mapped by post_id defined in r'^post/(?P<post_id>\d+)/detail.html$'
def post_detail(request, post_id):
try:
post = m.Post.objects.get(pk=post_id)
except m.Post.DoesNotExist:
# If no Post has id post_id, we raise an HTTP 404 error.
raise Http404
return render(request, 'post/detail.html', {'post': post})
[/python]
Then we need to add a new template file at myblog/templates/post/detail.html:
[python]
<div>
<h1>{{ post.content }}</h1>
<h2>{{ post.created_at }}</h2>
</div>
[/python]
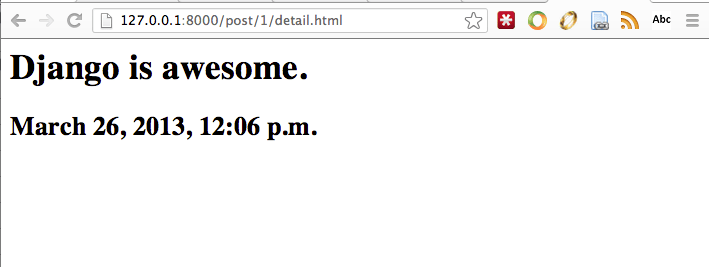
Now you can access the URL Post Detail:
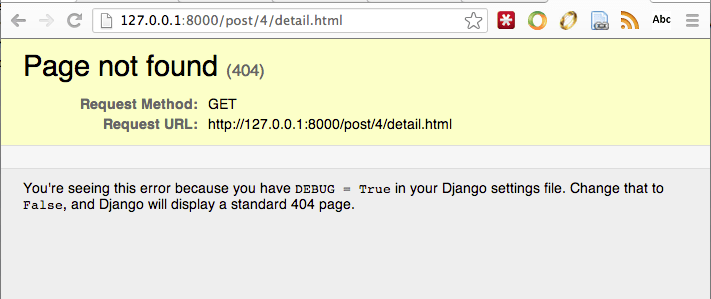
If you access a Post whose id is not in the database, our detail view will show a HTTP 404 error page:
Summary
In this article, we wrote our first two views. The index view shows a list of posts that are created by users less than two days ago and the detail view presents the detailed content of a Post. Generally speaking, the process of writing a view involves:
- Write URL patterns for the view in
myblog/urls.py - Write the actual view's code in
myblog/views.py - Write a template file in the directory
myblog/templates/