In our last instalment, we discussed Qt's QListWidget class, which allows the user to make simple single-column list boxes. For more advanced list controls, however, a more flexible widget is required; for that reason, Qt supplies the QListView widget, which allows more varied items to be created. It is a pure presentation widget, which displays information provided by a data model. This separates the logic of the data being presented from the widget that does the presentation; there are multiple widgets that can display data from the same model structures.
There are some specialized types of model already created for you. For example, the QStandardItemModel provides limited capabilities that are somewhat greater than those we saw in last installment's discussion of the QListWidget; in addition to text and icons, it provides drag-and-drop capabilities, checkable items, and other features. Custom behavior can be implemented by inheriting from the QAbstractListModel, a general-purpose model for list data.
PySide/PyQt's QStandardItemModel
We'll begin by discussing use of a QListView with a QStandardItemModel. The QListView is instantiated just like any other QWidget — are you getting bored with that line for every widget we encounter? It makes tiresome reading, but an easily remembered object model; one of PyQt/Pyside's greatest strengths is its simplicity, memorableness, and consistency. That aside, the QListView's constructor takes an optional parent:
[python]
list = QListView(parent)
[/python]
Easy enough. Now our list needs a model to manage its data. We'll create a QStandardItemModel with our list as its (optional) parent:
[python]
model = QStandardItemModel(list)
[/python]
There are other constructor signatures for the QStandardItemModel, but they're not relevant to our single column list; we'll discuss them another time.
PySide/PyQt's QStandardItem
Creating the list and model is the simple part; the main work of the list comes in creating and populating the model. For example, let's create an item for our list:
[python]
item = QStandardItem()
[/python]
We can set its text and icon in convenient ways:
[python]
item.setText('Item text')
item.setIcon(some_QIcon)
[/python]
We could also have created our item with its text (and icon, if desired) already set:
[python]
textual_item = QStandardItem('Item text')
text_and_icon_item = QStandardItem(some_QIcon, 'Item text')
[/python]
We can also make an item checkable, which adds a checkbox at the leftmost part of the item:
[python]
item.setCheckable(True)
[/python]
If you want your checkboxes to have three states — checked, unchecked, and null — use item.setTristate(bool).
A Brief QStandardItem Example
That's enough background that we can give a simple example of the appearance of a QListView, though it won't do anything yet. We'll simplify as much as possible by making our main window a QListView; we'll do the same basic setup as any QWidget-as-a-window example:
[python]
list = QListView()
list.setWindowTitle('Example List')
list.setMinimumSize(600, 400)
[/python]
Next, we'll create our model:
[python]
model = QStandardItemModel(list)
[/python]
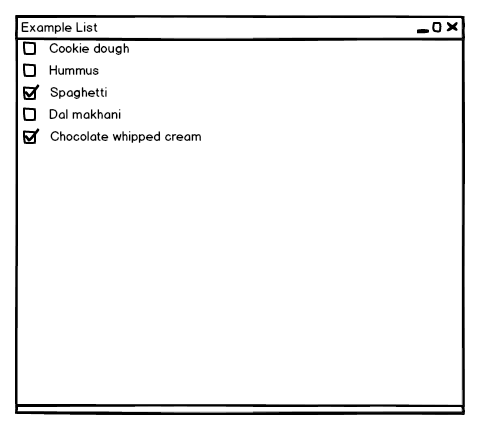
Then, we'll create some QStandardItems to fill our model. As a tribute to my wife — we're expecting a third baby this summer — I'll make it a list of foods she has craved thus far. Each will have a text caption and a checkbox:
[python]
foods = [
'Cookie dough', # Must be store-bought
'Hummus', # Must be homemade
'Spaghetti', # Must be saucy
'Dal makhani', # Must be spicy
'Chocolate whipped cream' # Must be plentiful
]
for food in foods:
# Create an item with a caption
item = QStandardItem(food)
# Add a checkbox to it
item.setCheckable(True)
# Add the item to the model
model.appendRow(item)
[/python]
Finally, we'll apply our model to the QListView, show the window, and run the app:
[python]
list.setModel(model)
list.show()
app.exec_()
[/python]
The complete example, with the explanations trimmed and relegated to comments, is:
[python]
# Create a Qt application
app = QApplication(sys.argv)
# Our main window will be a QListView
list = QListView()
list.setWindowTitle('Example List')
list.setMinimumSize(600, 400)
# Create an empty model for the list's data
model = QStandardItemModel(list)
# Add some textual items
foods = [
'Cookie dough', # Must be store-bought
'Hummus', # Must be homemade
'Spaghetti', # Must be saucy
'Dal makhani', # Must be spicy
'Chocolate whipped cream' # Must be plentiful
]
for food in foods:
# create an item with a caption
item = QStandardItem(food)
# add a checkbox to it
item.setCheckable(True)
# Add the item to the model
model.appendRow(item)
# Apply the model to the list view
list.setModel(model)
# Show the window and run the app
list.show()
app.exec_()
[/python]
When run, it will look something like this:
Adding Simple Functionality
That's all well and good, but it doesn't do anything yet. Let's look at how to make a QListView with a QStandardItemModel respond to user interaction.
You might imagine that each QStandardItem would be like a QPushButton and would emit signals when it is selected, checked, edited, and so forth — at least, if you're like me, that's what you would expect. If so, you would, like me, be wrong. There is effectively one signal that indicates what has happened to items in a QStandardItemModel, and that is itemChanged(item). As you can see, it carries to its slot the item that has been changed, and to tell what has happened to it, you need to inspect the item. I find this less than ideal, but it's what we get.
You can inspect items that have not been changed by using the model's item method; that returns the item at a specified zero-based row. (It can also accept a column for multi-column models, which we may see another time.)
There are also a great number of signals that indicate changes to the structure of the model; these are all inherited from QAbstractItemModel and can be inspected here. We'll talk more about them in a later discussion of the QAbstractItemModel, which is another topic altogether; for our current example, we won't need any of them.
Let's make our list into a honey-do list; you check off items as you purchase and/or prepare them, and when you're done, the window closes. (I know, this is a highly artificial and constructed example.)
First, we change the title:
[python]
list.setWindowTitle('Honey-Do List')
[/python]
Then, we'll need a slot to connect to the model's itemChanged signal. We'll have it first check if the changed item is checked using its checkState method, to avoid going through all the items every time. If it is checked, we'll see if the others are checked; if they all are, we'll have the QApplication quit:
[python]
def on_item_changed(item):
# If the changed item is not checked, don't bother checking others
if not item.checkState():
return
i = 0
# loop through the items until you get None, which
# means you've passed the end of the list
while model.item(i):
if not model.item(i).checkState():
return
i += 1
app.quit()
[/python]
Then, we'll hook the itemChanged signal up to our slot:
[python]
model.itemChanged.connect(on_item_changed)
[/python]
That's all we need to do. Here is the full code for our modified example:
[python]
# Create a Qt application
app = QApplication(sys.argv)
# Our main window will be a QListView
list = QListView()
list.setWindowTitle('Honey-Do List')
list.setMinimumSize(600, 400)
# Create an empty model for the list's data
model = QStandardItemModel(list)
# Add some textual items
foods = [
'Cookie dough', # Must be store-bought
'Hummus', # Must be homemade
'Spaghetti', # Must be saucy
'Dal makhani', # Must be spicy
'Chocolate whipped cream' # Must be plentiful
]
for food in foods:
# Create an item with a caption
item = QStandardItem(food)
# Add a checkbox to it
item.setCheckable(True)
# Add the item to the model
model.appendRow(item)
def on_item_changed(item):
# If the changed item is not checked, don't bother checking others
if not item.checkState():
return
# Loop through the items until you get None, which
# means you've passed the end of the list
i = 0
while model.item(i):
if not model.item(i).checkState():
return
i += 1
app.quit()
model.itemChanged.connect(on_item_changed)
# Apply the model to the list view
list.setModel(model)
# Show the window and run the app
list.show()
app.exec_()
[/python]
That is a simple application of a QListView. It can do much more, but the same model can be used for other widgets, and we'll look at more of its capabilities another time. Next time, we're going to look at something completely different, one of the controls that excites me most in Qt: the QWebView, a WebKit based control to render HTML/CSS/XML/XSLT pages.