Prerequisites
If you're new to Python make sure to read our previous article. It is compatible with all different operating systems. It's easy to set up in fact, if you're using the Linux system you will have python pre-installed. In this article, you'll know:
- How to check the python version?
- How to download Python?
- The Differences between Python versions 2.x and 3.x
- How to set up a ready python environment.
How to check the Python version?
Some operating systems come with Python pre-installed Like macOS or Ubuntu. Other operating systems like Windows don't have it installed out of the box.
In order to check whether Python is installed or not in open the terminal in macOS or Linux. Write the below command:
python --version
output:
Python 3.7.2
If you're using windows. Open the CMD and write:
python -v
Another way to check the Python version is to write python. It should open the Python shell or raise an error.

If your operating system doesn't have Python installed.
How to download Python?
One of the best features of Python is its compatibility. It can be easily installed in any operating system. You can install it via command line or GUI.
Python installation in Linux based operating systems is very easy. In this case, we will check the installation for Ubuntu. It's almost the same in other Linux distributions.
- Install dependencies.
$ sudo apt-get install software-properties-common
$ sudo add-apt-repository ppa:deadsnakes/ppa
- Update the OS package manager
sudo apt-get update
- Install the latest version
$ sudo apt-get install python3.8
Note that the version of python will depend on your distribution. For example, installing a Python36 the package on Fedora 25 to get Python 3.6.
How to Install it in windows:
- Visit the official website.
- Navigate to downloads > windows.
- Select your version.
- Open the .exe file.
- Click install now.
- Proceed with next.
- Finish the installation and click close.
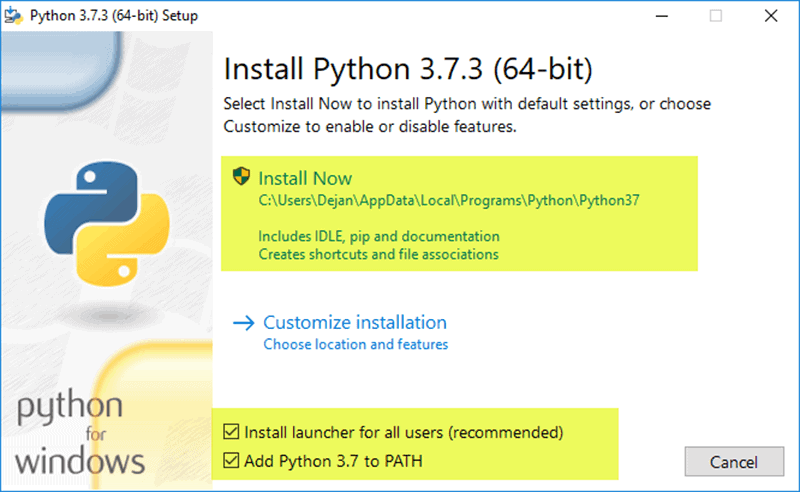
setup python for windows

The final step of windows installation.
How to install Python in macOS:
- Do the above steps
- From the downloads section select MacOS X
- Click on the macOS installer.
- Open the downloaded file.
- Click to continue with recommended settings.
- After finish, you will have it installed.
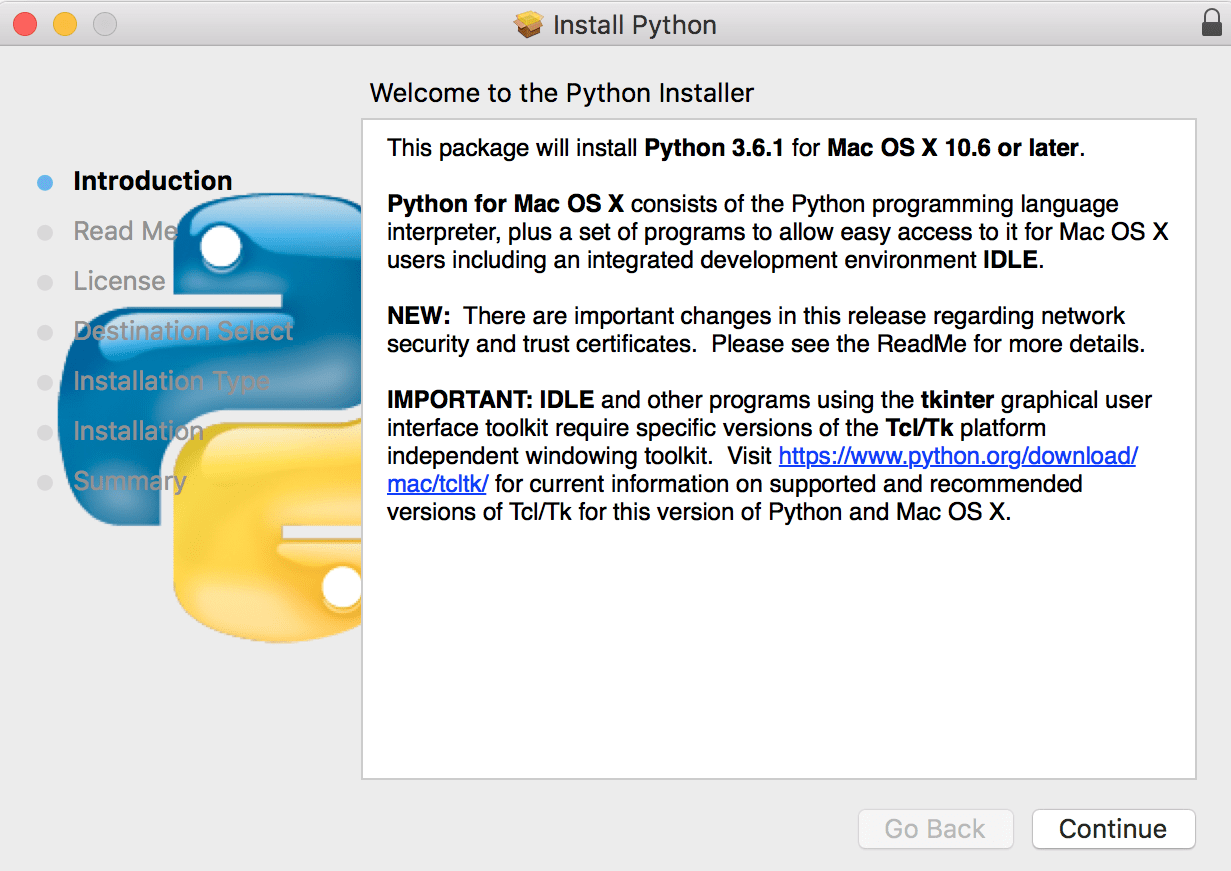
The installation process in macOS
What is the difference between Python2.x and 3.x?
If you're trying to start learning Python, you'll find two versions. The 2.x and the 3.x. What is the difference?
Python is like any other language that has versions. The goal of versioning is to track the updates. Each version has its own features. Why are we versioning the updates of any language?
The goal is to be able to track the updates. In the software industry, updating the language can have a side effect. The update can have a deprecated feature or syntax change. An auto-update can lead to project failure. Versioning helps us to specify a version that our project will run with it. This leads to less error, and increase the lifetime of the project. The version number consists of two parts. Like this (2.7 or 3.8). The first number is referring to a Major change. Change that could lead to deprecate some feature or syntax change. The second number is referring to a minor update or fix. Each update has a changelog. With that changelog, developers can track the changes to update their projects. It's always recommended to work with the latest version of the language.
In Python, there are two versions 2.x and 3.x. The difference is major. Updating the 2.x project to 3.x will lead to a syntax error. What is the difference between 2.x and 3.x? Which one you should learn?
Integer division:
Divide two integers in 2.x will not have a float value.
# Python 2.x
print 5 / 2

output:
# 2

# Python 3.x
print(5 / 2)

output:
# 2.5
Print function:
The print function in 3.x brackets is mandatory. The print function in Python2.x brackets are optional.
# Python 2.x
print "Hi weclome to python 2.x"

output:
# Hi weclome to python 2.x

# Python 3.x
print("Hi weclome to python 3.x")

output:
# Hi weclome to python 3.x
Unicode:
In 2.x the implicit string type is ASCII. But with 3.x it's UNICODE.
print('sample word')
print(b'sample word')

# Python 2.x
output:
# <type 'str'>
# <type 'str'>

# Python 3.x
output:
# <class 'str'>
# <class 'bytes'>
In 2.x both are the same type. But In 3.x they are different types. This doesn't mean that Python2.x doesn't support Unicode. It supports Unicode with different syntax print(u'this is a text ') .
Range and xrange:
The statement xrange is deprecated in Python3.x. You can check our full article about the range function.
# Python 2.x
for x in xrange(1, 5):
    print(x)

output:
# 1 2 3 4

# Python 3.x
for x in xrange(1, 5):
    print(x)

output:
Traceback (most recent call last):
  File "<stdin>", line 1, in <module>
NameError: name 'xrange' is not defined

It should be
for x in range(1, 5):
    print(x)

output:
# 1 2 3 4
Error handling:
Error exception handling in Python3.x should be defined with as.
# Python 2.x
try
    variable_name
except NameError, err:
    print err, 'ops defined before assign.'

# output:
(NameError("name 'variable_name' is not defined",), 'ops defined before assign.')

# Python 3.x
try:
    variable_name
except NameError, err:
    print err, 'ops defined before assign.'

output:
 File "<ipython-input-1-942e89fbf9ab>", line 3
    except NameError, err:
    ^
SyntaxError: invalid syntax

It should be:
try:
    variable_name
except NameError as err:
    print(err, 'ops defined before assign.')
Note: Python2.7 support ended. If you're new to python It's recommended to start with Python3.x.
How to set up a ready python environment?
The different versions of python make it not practical to have a single setup for all projects. If you have a python2.x project, it'll not work on your python3.x environment. You need to isolate each project with its packages. This concept is called a virtual environment. It's an isolated environment with a specific version to run your project. Using a virtual environment will help you work with different projects easily. All you need it to activate the environment.
How to set up a virtual environment?
Installing a virtual environment ubuntu
- Make sure you have it is installed.
- Update your package manager
sudo apt update
- Install the pip package manager.
$ sudo apt install -y python3-pip
- Install the essentials tools.
$ sudo apt install -y build-essential libssl-dev libffi-dev python3-dev
- Installing the virtual environment.
$ sudo apt install -y python3-venv
- Create a virtual env.
$ python3 -m venv <env_name>
- Activate the virtual env.
$ source <env_name>/bin/activate
Now you have an isolated playground. Any installed package will be in this virtual environment. If you are done you can simply write deactivate to deactivate the environment.
Conclusion
You can easily install python on any operating system. With its versioning system, you can choose the right version for your project. It's always recommended to work with the latest version. You should know the differences between versions. Updating project depends on what version you're using. It's recommended to use a virtual environment for each project. It helps you run multiple projects in the same machine.